- 1.800.834.8669
- LIVE Chat Support
You have no items in your shopping cart.


Installing Your Car Dash Cam DVR
Installing a car DVR camera, also known as a dash cam or car camera, is quick and simple.
The entire installation process takes on average between 5 and 15 minutes, depending on whether you want to conceal the cables running from the dashboard camera to your car’s power supply.
Most drivers prefer to conceal the power cables for a cleaner and less obstructive look. Below is a guide to help you conceal your dash cam’s power cables in 8 easy steps.
What you’ll need:
- Dash cam
- Suction cup
- Power cable
- Pen or small plastic tool to help tuck cables
- Zip ties (optional)
Installing your dashboard camera with concealed wiring can be done just a few easy steps.

1. Place dash cam on the windshield using suction cup
Placing the dash cam where you desire to have it is the first step to installing a dash cam. Make sure it’s placed such that it doesn't obstruct your view and records the front of your vehicle as it should.
We recommend placing it and quickly connecting it in order to get the placement right before concealing the cables. This way, you’ll be able to get a live preview of what to expect and no surprises when you finish installing it.

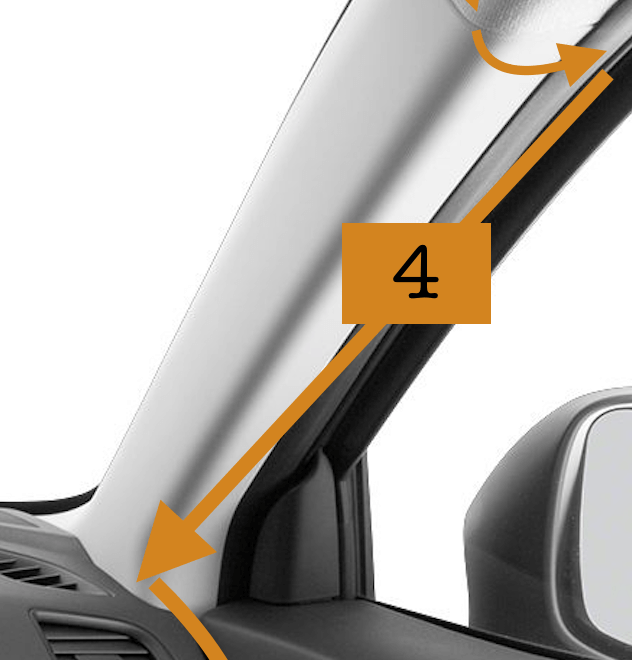
2. Run the power cable straight up to the headliner and run across the passenger side
Once you have the placement right, you want to connect the power cable to the camera and run it up towards the car’s headliner.
Proceed to tuck the cables into the headliner across the passenger side all the way to the side panel.

3. Tuck the cable inside the side panel
Proceed to tuck in the cables inside and around the side panel all the way to the weather stripping. Depending on the car model, you may be required to unclip the side panel in order to do so.
Do NOT cover any airbag entry points under any circumstances
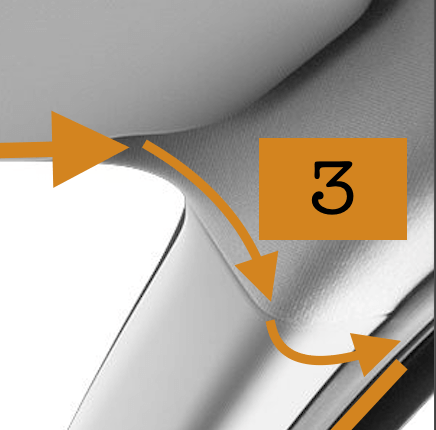
4. Run the cable down the weather stripping
Once the cables are passed through the side panel, proceed to tuck it in and down the weather stripping.
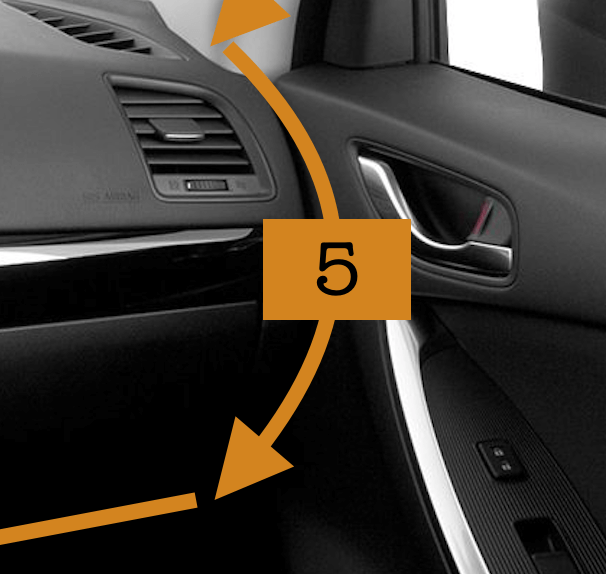
5. Run cable through side panel and around the glove box
From the weather stripping, pass the cables around the side panel and down through the side of the glove box.
6. Place cable under car mats or zip tie under the glove box
From the side of the glove box, you can decide to either run the cables on the floor and below the car mat (simple method) or you can zip tie the cable to the bottom of the glove box (advanced method).
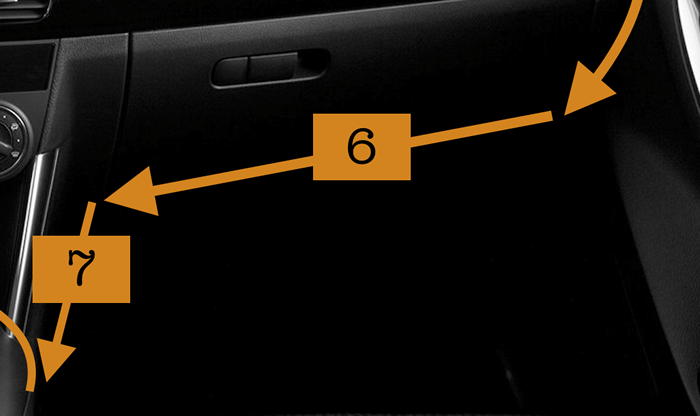
7. Run along the base of the center console
Once passed the glove box, run the cable along the center console (about half way). You may be able to conceal the cable inside or around the center console.
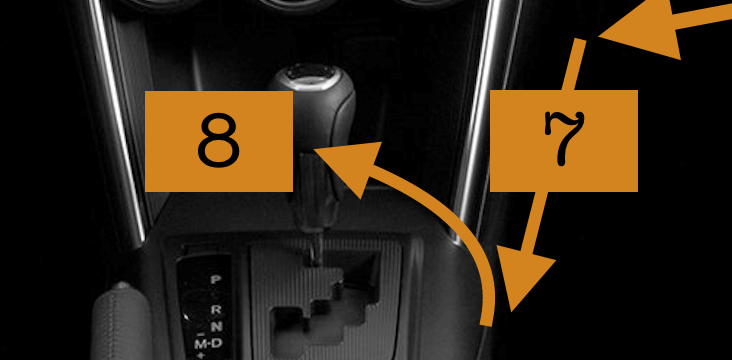
8. Plug into car’s cigarette lighter outlet or USB port
From the middle of the center console, wrap the cable over and plug it into the power source. Turn on your car and the camera will turn on and begin recording automatically.
Too complicated?
If you are not comfortable running cables and tucking them inside the headliner, you can always have a mechanic do it for you. It should take the mechanic no more than 15 minutes to run the cables along the car for a clean and concealed look.


FREE EXPEDITED SHIPPING to the United States & Canada on all orders.

100% Satisfaction Guaranteed

Shop With Confidence
SAFE & SECURE SHOPPING. GUARANTEED!


Customer Reviews & Ratings
THOUSANDS OF HAPPY CUSTOMERS!